A step-by-step manual for producing your own NFT.
Do you wish to learn how to produce and market an NFT? As a feasible way to commercialize their work, many artists are looking into the idea of turning their creations into nonfungible tokens. By creating secure ownership of an original digital asset and giving access to vibrant, new communities of potential buyers, NFTs enable the digital sale of art.
Despite multiple recent incidents of NFT work being misappropriated, misissued, or stolen, as well as exchanges being hacked, non-fungible tokens are still in use and becoming increasingly relevant to artists. NFT collections are now being physically shown in galleries.
In essence, the term “non-fungible” means “unique” or “irreplaceable.” By offering a way to build a digital record on a blockchain to prove ownership of the original file or object, nonfungible tokens, or NFTs, make often readily copied digital items unusual and hence valuable. NFTs are typically associated with digital art, but they may also be used to represent everything from real estate to music to movies.
Read our description of what NFTs are in order to have an understanding of them before learning how to create and sell them. We developed NFT drop rules and explained how to spot a fake NFT in this post.
A Word of Caution on How to Manufacture and Sell an NFT
The high-profile sales of artists such as Beeple, who notably sold his The First 5000 Days NFT for $69 million, have enticed many artists to learn how to manufacture and sell NFTs. Such staggering figures reflect a relatively modest percentage of NFT sales. The majority of NFT art sells for the same prices as other good work would. One significant distinction is that NFTs can allow digital artists to collect royalties on all future sales whenever their NFT is transferred – this can be written into the initial smart contract.
Another thing to keep in mind right away is that there are several expenses associated with creating, maintaining, and selling an NFT. While certain NFT markets now offer fee-free NFT minting, with the expense placed on the buyer, in most situations, the creator must pay for minting the NFT, whether they sell it or not. For more information, see our free NFT lesson.
Despite the fact that the NFT market has experienced a little decline this year, an increasing number of artists, illustrators, and designers are making a living by selling NFTs.
Nonfungible.com estimates that primary and secondary sales on the Ethereum blockchain would exceed $15 billion in 2021, up from $67 million the previous year. So, if it appears to be an option for you, let’s get started with the fundamentals of making and selling NFT. We’ll walk you through the process step by step and go over NFT marketplaces, NFT cryptocurrency, and anything else you need to know.
How to make and sell an NFT
The first step in creating and selling an NFT is to ‘mint’ it (assuming you already have the piece of art you want to transform into an NFT). To create an NFT of your artwork, you’ll need to select an NFT platform and a payment wallet – the latter will be required to pay the fees for the former, as well as to receive any payout if your NFT is successful. We’ll use Rarible as the NFT platform and MetaMask as our payment wallet to demonstrate the process.
Select a digital wallet
You’ll need bitcoin to create and sell an NFT. Most NFT auction sites will charge you a fee to’mint’ an NFT, which is the process of converting your artwork into a non-fungible token that you may sell. Because it is the primary cryptocurrency of the open-source blockchain platform Ethereum, where NFTs first appeared, the cryptocurrency ether (abbreviated as ETH) is the most generally accepted form of payment.
Some platforms are beginning to accept a variety of payment formats and to construct NFTs utilizing various blockchains, some of which are more environmentally friendly.
Make sure your existing ETH is stored in a digital wallet that you can connect to your preferred NFT platform in order to send and receive payments. If you don’t have any cash, there are several cryptocurrency exchanges where you may purchase ETH, but the quickest and easiest way is generally to purchase straight using your preferred digital wallet.
There are several NFT payment systems to select from, including Coinbase, MetaMask, Torus, Portis, WalletConnect, MyEtherWallet, and Fortmatic. We’ll use MetaMask as an example, but you could use any of the platforms listed above, as well as many more. In most circumstances, the procedure is the same. Before making a decision, we recommend thoroughly researching the expenses involved.
If you’d rather use another platform, or if you already have a digital wallet and understand how it works, skip to step 4. Otherwise, we’ll walk you through setting up your wallet and purchasing ETH in the following step.
To pay for your NFT, create a digital wallet

Visit the MetaMask website and choose the blue “Download” button in the top-right corner to generate a digital wallet that will allow you to pay an NFT platform to produce and sell an NFT. The browser extension will be installed since we’re using a desktop computer, but there is also a mobile app available.
You will be prompted to confirm your want to ‘create a new wallet and seed phrase.’ Don’t be too concerned with what a “seed phrase” is (it’s just a list of words that holds blockchain information). Say yes, and then it’s only a question of agreeing to the conditions, establishing a password, and going through basic security checks to have your account set up.
Insert bitcoin into your wallet

After you’ve created your MetaMask wallet, or any digital wallet, you’ll need to fund it with ETH. If you don’t already have some ETH, you’ll need to purchase some now, so click the ‘Buy’ button and choose ‘Buy ETH with Wyre’.
You’ll be brought to a screen where you may buy ETH using Apple Pay or a debit card. You may delay this stage till later if you don’t want to part with any money yet; it simply takes a bit more faff (you’ll want to check your preferred NFT platform’s costs to know how much you’ll need to buy).
The cryptocurrency jargon might make this portion of learning how to produce and sell an NFT seem overwhelming, but purchasing money is actually fairly simple. Just keep in mind that the value of Ether, like bitcoin and many other cryptocurrencies, may vary dramatically.
The price of one ETH has risen from about $1,000 to over $4,700 at the time of writing, with several peaks and valleys along the way. It is very conceivable for the currency’s value to fluctuate by hundreds of dollars in a matter of hours.
Link your wallet to an NFT platform
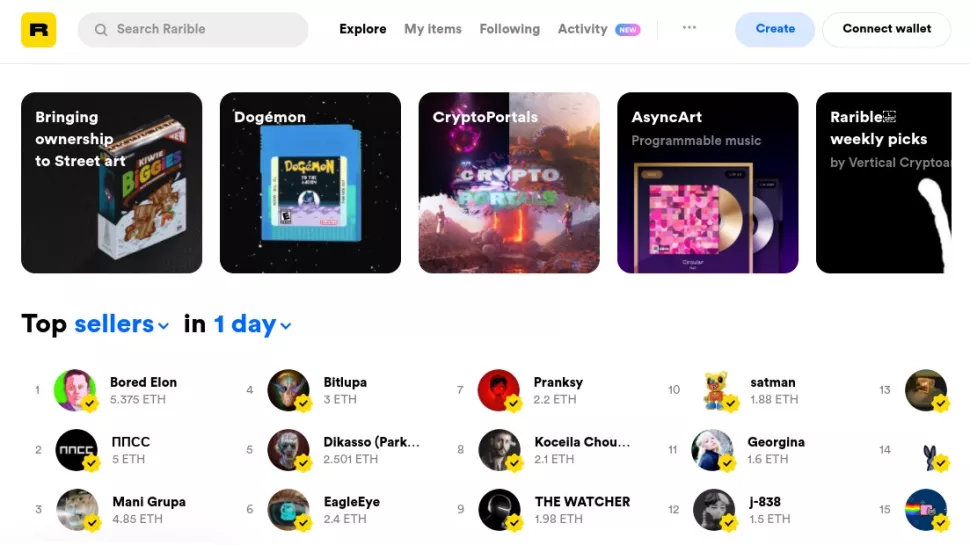
The majority of digital wallets function similarly. Regardless of the option you select, you must link it to the NFT platform you’ll be using to sell the NFT. We’re using Rarible as an example, but there are many more NFT platforms to pick from, and the procedure will be broadly similar to what we detail below.
Visit Rarible.com (shown above). A ‘Connect wallet’ button is located in the upper right-hand corner of the screen. When you click there, you’ll be asked for your wallet provider, which in our instance is MetaMask. A window will appear, giving you the opportunity to link your wallet to Rarible. Click ‘Next,’ then ‘Connect,’ agree to the terms of service, and confirm you’re above the age of 13.
Upload the file to be converted into an NFT
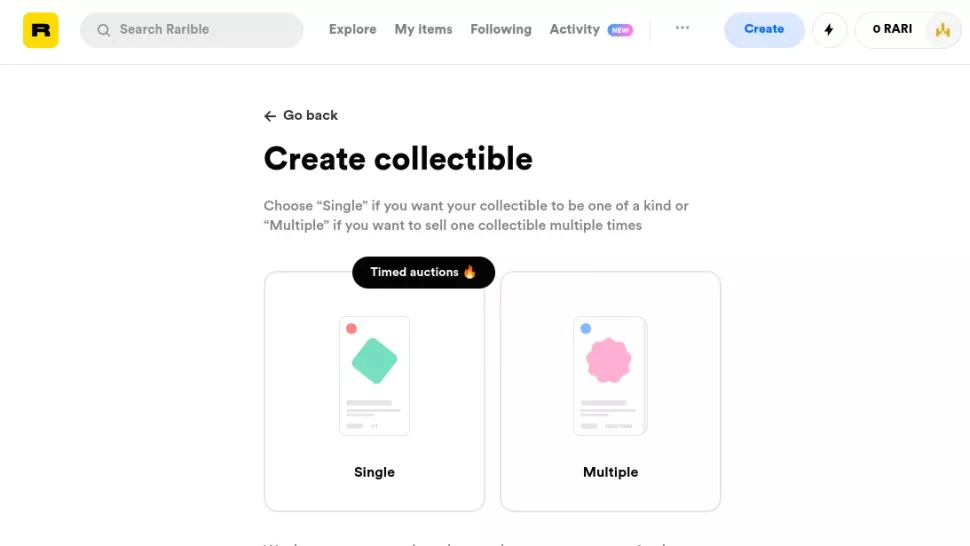
So, now that you have a wallet linked to ETH for payment, you are ready to create and sell an NFT. Click the blue ‘Create’ button at the upper right of the Rarible website. You will then be offered the choice of creating a single, one-time work or selling the same thing several times.
In this case, we’ll go with ‘Single.’ You must now upload the digital file that you wish to convert to an NFT. Rarible allows up to 30MB PNG, GIF, WEBP, MP4 and MP3 files.
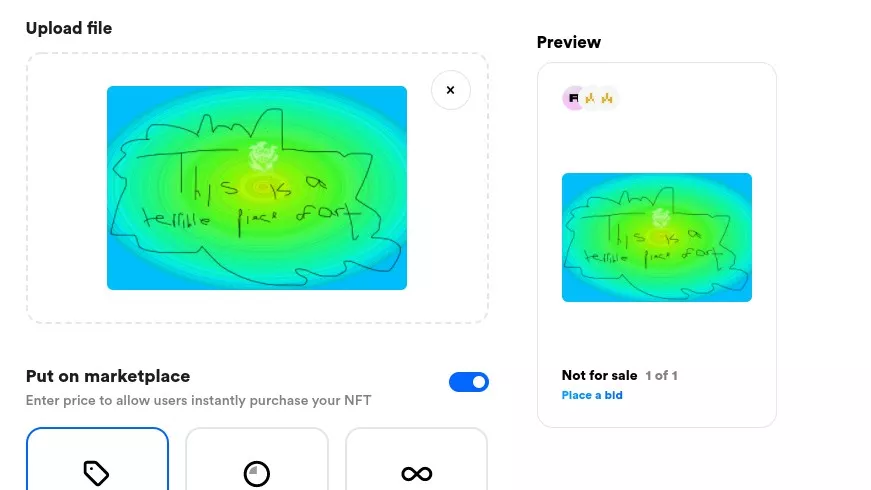
To demonstrate, we made a piece of art that is ironically terrible. Upload your digital asset, and a preview of your NFT post will appear on the right.
Create an auction for your NFT
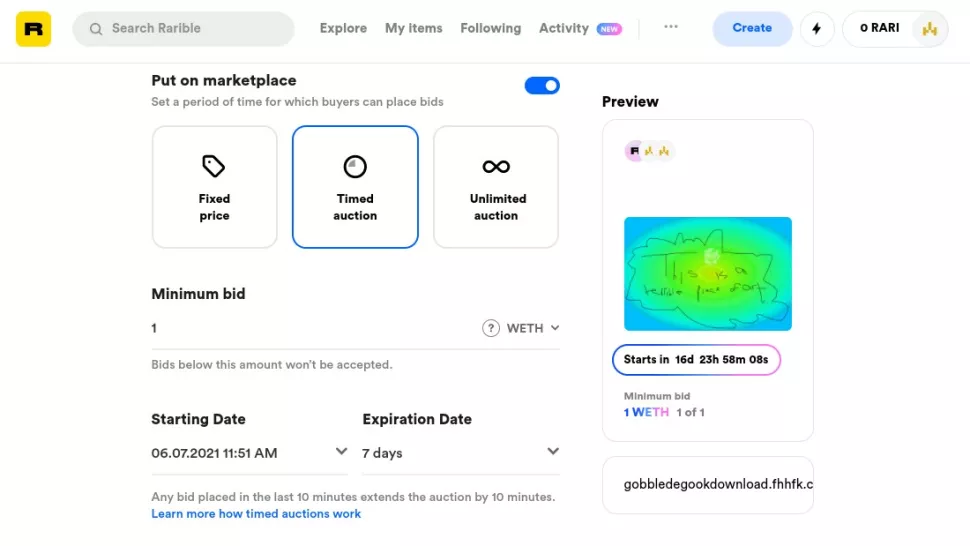
You must decide how to sell your NFT artwork in the following section of the form. There are three choices. ‘Fixed price’ allows you to select a price and sell your NFT immediately (similar to eBay’s ‘Buy it now’ option). The ‘Unlimited Auction’ option allows individuals to keep bidding until you accept one. Finally, a ‘timed auction’ is an auction that only lasts a certain amount of time. As an example, let’s go with that choice.
This brings us to the most difficult part: deciding on a starting price. If you sell your NFT too cheaply, the massive fees will eat away your profit, perhaps leaving you out of pocket. We’ll set our price at an aggressive 1 ETH (now $4,700) and offer people seven days to bid.
Following that, you have the option to ‘Unlock once bought.’ This allows you to present your eventual customer with a full, high-resolution version of your artwork as well as other content via a secret web page or download link. The option below that, labeled ‘Choose Collection,’ is the most perplexing. This is a highly technical inquiry concerning how the blockchain works. The default setting is ‘Rarible,’ and we recommend leaving it that way.
To sell your NFT, include a description
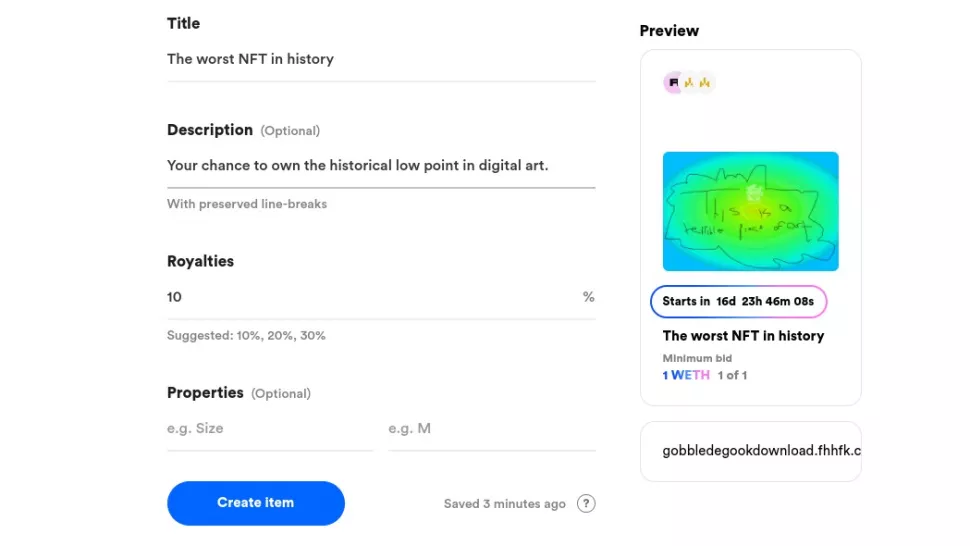
You may now give your listing a title and a description. Spend some time considering this to increase the likelihood that your NFT will sell. You are then asked to consider what proportion of royalties you want to claim on any future sales of your art.
Again, a greater percentage will net you more money per sale in the long term, but it will also discourage people from reselling your art in the first place since they will be less likely to make a profit for themselves. Finally, there is an optional box where you may enter the characteristics of your file. You’re almost through with it.
To sell your NFT, pay the listing cost
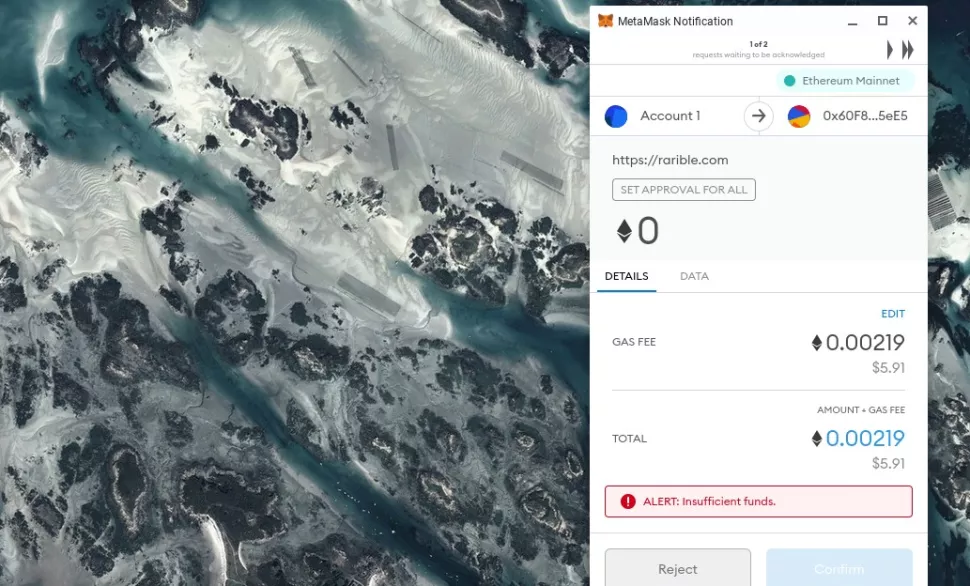
By clicking “Create Item,” you’ll be given the opportunity to connect with your wallet and pay the listing fee, which is the last step in learning how to create and sell an NFT. Don’t worry if you don’t have enough money in your wallet: you won’t have to start again. Simply click on the wallet icon in the top-right corner of the screen, and you’ll be able to add funds from within Rarible.
Before we begin, a final word of caution. The listing charge may appear to be low: in our instance, it came to just $5.91 in US dollars. But this is merely the beginning. Before you can proceed, you must agree to pay an additional cost to construct your NFT, which in our instance would have been the equal of $42.99 in ETH.
If someone buys your NFT, you’ll have to pay a commission charge on the NFT sale as well as a transaction fee for the money to be sent from the buyer’s wallet to your own.
You’re forced to take the chance and wait to see how much you’ll be charged overall if you make a sale, hoping to still earn a profit. If you do decide to take a chance and invest in developing NFT art, we wish you the best of success.


